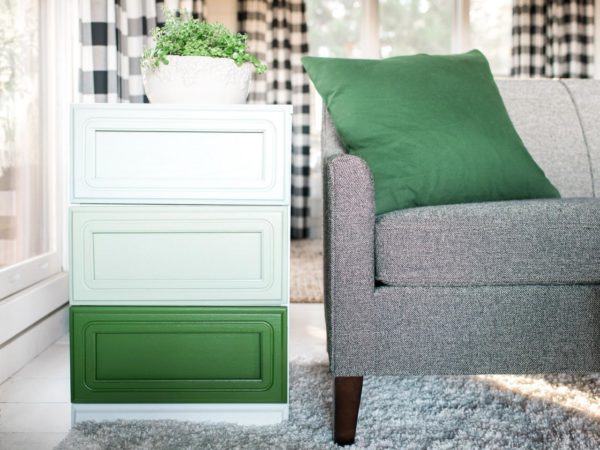
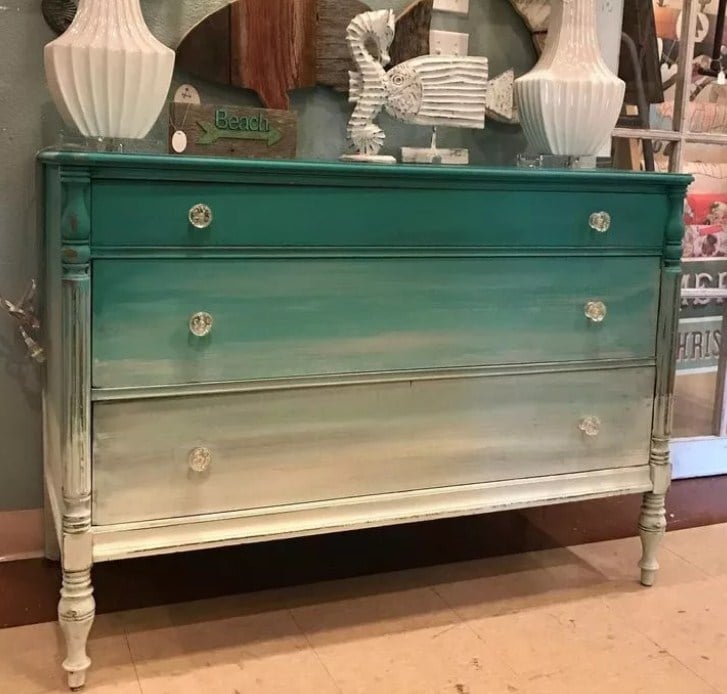
Learn how to paint ombre on wood furniture when you want to achieve a unique look for handmade or upcycled pieces. Defined by Merriam-Webster as “having colors or tones that shade into each other,” ombre pieces feature blended hues with seamless transitions for an eye-catching effect that works equally well for mild to wild furnishing styles. The forgiving water-based formulation and versatile consistency of Real Milk Paint lend themselves perfectly to this trendy technique, helping you achieve great results whether you’re adding an ombre effect to an accent table, dresser or buffet.

WHAT IS THE OMBRE EFFECT?
Ombre effect means gradation of light color to dark color and vice-versa. It is a gradual color transition from one shade to another. This effect is often used in hair styling, clothing, and painting but can also be applied to other aspects of life. While there are many ways to create an ombre effect, the goal is always the same – to create a visually pleasing gradient from lightest color to its darkest shade. Whether you’re looking to try out the ombre trend or just want to learn more about it, this article will teach you the things you need to know.
The Ins and Outs of Ombre Painting
Originally a fabric dyeing technique first used in the 1800s, ombre has jetted to the top of trends due to a 21st-century revival in use for everything from clothing, accessories and hairstyles to walls, furniture and artwork. The seamless transition of the ombre effect makes it an especially popular choice for interior design, as it ties rooms with furnishings in the same color family together without adding an artificial monochromatic feel. Though a relatively easy technique to master, this decorative technique requires a bit of practice to get just right, so you may want to experiment with canvas ombre painting before committing to bigger projects that need a bit more skill for satisfying results.
How to Paint Ombre on Wood Furniture
Our step-by-step guide walks you through the ombre painting process, but there are some things to consider before completing this tutorial. First, decide on the colors you want to use in your ombre design. This blending technique works best with complementary hues within the same color family, so it’s relatively simple to pick out shades that mesh with your creative vision. For example, Real Milk Paint colors like Aqua, Beachglass and Caribbean Blue work well for an oceanic look, while Pecan, Golden Rod and Mustard help you capture a sunset-like effect. You can also experiment with contrasting shades to add a bolder ombre effect to small accent pieces when you want some extra excitement in your living space.

Gather Ombre Painting Supplies
The first step for creating an ombre design is gathering your supplies. Be careful in choosing your paint colors, for example blending red and green can create a muddy brown color, which may not be the color you’re going for. You can use analogous colors on the color wheel for better results. You need the following items at hand before you get started:
- The furniture you wish to paint
- Two to three Real Milk Paint colors
- Three to four paintbrushes
- A drop cloth to protect flooring
- A tape measure for color blocking
- A spray bottle full of water
- Paper towels
- Containers to separate paint
Once you’ve gathered all your ombre paint supplies, it’s time to mix your Real Milk Paint colors. Typically, our milk paint powder mixes at a 1:1 ratio with water, but you may want to experiment with consistency for different projects. Adding more water to the mixture can create a wash effect which can be helpful while blending colors. It typically takes about 20 minutes for the foam to dissipate after mixing, so you may want to add our Anti-Foaming Agent if you wish to get started on your ombre design right away. Additionally, if you’re planning on painting ombre furniture for use on your porch or deck or in your garden, add our Outdoor Additive during this step for increased resistance to mold and mildew as well as unsightly knots from bleeding through your masterpiece. Place your piece on top of the drop cloth now and prep your surface for ombre painting.
Prep Surfaces for Ombre Painting
Before you start adding an ombre effect to your piece, clean the furniture with Tri-Sodium Phosphate to remove all residual dirt, dust and grime and remove any metal staining with Oxalic Acid Wood Bleach. Real Milk Paint doesn’t require sanding before application, but you may want to lightly sand the piece anyway if you haven’t stripped it bare of paint or varnish with Soy-Gel Professional Paint Remover beforehand. There’s also no need to prime surfaces for ombre painting with our milk paint — it adheres beautifully to numerous porous surfaces. When combined with our Ultra Bond Adhesion Promoter in the mixing step, you are able to paint over slick or previously finished surfaces.
Apply Paint in Strips
Now that your furniture piece is clean and ready for color, apply your paint colors in even strips horizontally or vertically, depending on the look you wish to achieve. Freehand the application if you like a softer design, or use a tape measure to evenly block off areas for specific ombre paint colors. Keep in mind that paint application doesn’t have to be perfect since other coats go on top of it, but it helps to keep it fairly even to better gauge where each shade belongs. To make the lighter color, just add in a dab of white milk paint to your main color. Additionally, leave a little room between the hues since you’re not blending them together just yet.

Blend Paint for an Ombre Effect
The first step to blending paint for an ombre effect is creating a wet edge between the different colors. Start by wetting the bottom of the top stripe and the top of the lower stripe with a fresh coat of paint, working in small sections to keep paint layers even as you blend. Since you’re mixing colors together in this step, it helps to pour paint color into a separate container to prevent muddying during the ombre blending process. You can use a piece of paper plate or cardboard to mix colors. Next, angle your brush to approximately 45 degrees and use it to create X patterns between lighter shade and darker colors, blending the two hues as you go. If your paint colors start drying out, simply spritz them with a bit of water to encourage flow. Repeat this process between color edges until you get the ombre effect you desire.
GET STARTED WITH YOUR PROJECT
Now that you know how to paint ombre furniture, you can add this trendy effect to a multitude of DIY furniture and decor projects. Although this tutorial is for painting ombre on wood, the same principles can be applied to other surfaces. Just about everything can be painted ombre, you can paint sign, benches or even walls. If you’ve ever wanted to learn how to paint ombre but were unsure where to start, we hope this tutorial was helpful.
Rely on the Real Milk Paint Co. to foster your creativity as you build your skill set via a flexible array of easily blendable colors ideal for ombre painting techniques. Additionally, we carry specialty additives and tools that extend the use of our paints and enable easy application, whether you’re creating interior or exterior ombre walls or jazzing up garage sale finds for resale. Get started with your project and reach us here: (800) 339-9748.


